Thinking about zapping your soup in a Mason jar? Hold on a second! Before you hit “start,” there’s a burning question many of us have: Are Mason jars microwave safe?
Mason jars are super popular for everything from drinks to leftovers, but just because they’re handy doesn’t mean they’re ready for every kitchen adventure. Let’s find out when these versatile jars are your best friend in the kitchen, and when it’s safer to keep them away from the microwave, freezer, oven, or even the dishwasher. Knowing the right way to use them will keep your jars (and your food!) safe and sound.
Are Mason Jars Microwave Safe? The Primary Question
This is perhaps one of the most frequently asked questions, and the good news is: Yes, glass preserving jars are generally safe for microwave use, but with very important caveats.
The fundamental reason glass is typically microwave-safe is that microwaves heat water molecules in food, not the glass itself. Glass, unlike metal, does not reflect microwaves. Therefore, if the glass itself is free of imperfections and used correctly, it won’t heat up directly from the microwave energy.
However, there are critical considerations and risks you must be aware of:
- Metal Lids and Bands: ABSOLUTELY NOT. This is the golden rule of microwaving anything. Metal in a microwave oven will cause arcing (sparks), which can damage your microwave, ignite contents, and potentially crack or shatter the glass jar. Always remove the metal lid and screw band before placing a jar in the microwave. If you need to cover the jar, use microwave-safe plastic wrap, a paper towel, or a microwave-safe plate.
- Thermal Shock: This is the most common culprit behind glass breakage in the kitchen. Thermal shock occurs when glass experiences a rapid and extreme change in temperature, causing it to expand or contract unevenly, leading to stress and ultimately, shattering.
- Examples to avoid: Placing a very cold jar (e.g., just out of the refrigerator or freezer) directly into a hot microwave, or conversely, taking a hot jar out of the microwave and placing it immediately onto a cold countertop or into cold water.
- Mitigation: Try to bring the contents to room temperature before microwaving if possible. If heating something cold, do it gradually, perhaps on a lower power setting for a longer time, or in shorter bursts.
- Older or Damaged Jars: Even microscopic cracks, chips, or flaws in the glass, whether from age, previous impacts, or manufacturing imperfections, can become weak points. When subjected to heating and cooling cycles, these weaknesses can escalate into full-blown breakage. Always inspect your jars for any visible damage before microwaving them.
Best Practices for Microwaving Glass Preserving Jars:
- Always remove all metal components.
- Use a microwave-safe cover if you need to prevent splatters.
- Start with room temperature contents if feasible to minimize thermal shock.
- Heat gradually: Use medium power settings or heat in shorter intervals, stirring the contents
- Use for reheating, not cooking: Jars are designed for storage and preserving, not for the rigors of cooking from raw in a microwave.
- Handle with care: Jars will become hot from the heated contents, so use oven mittens or a potholder when removing them from the microwave. Place them on a heat-safe surface.
Recommended Unique Mason Jars
")

")
Can You Freeze Mason Jars?
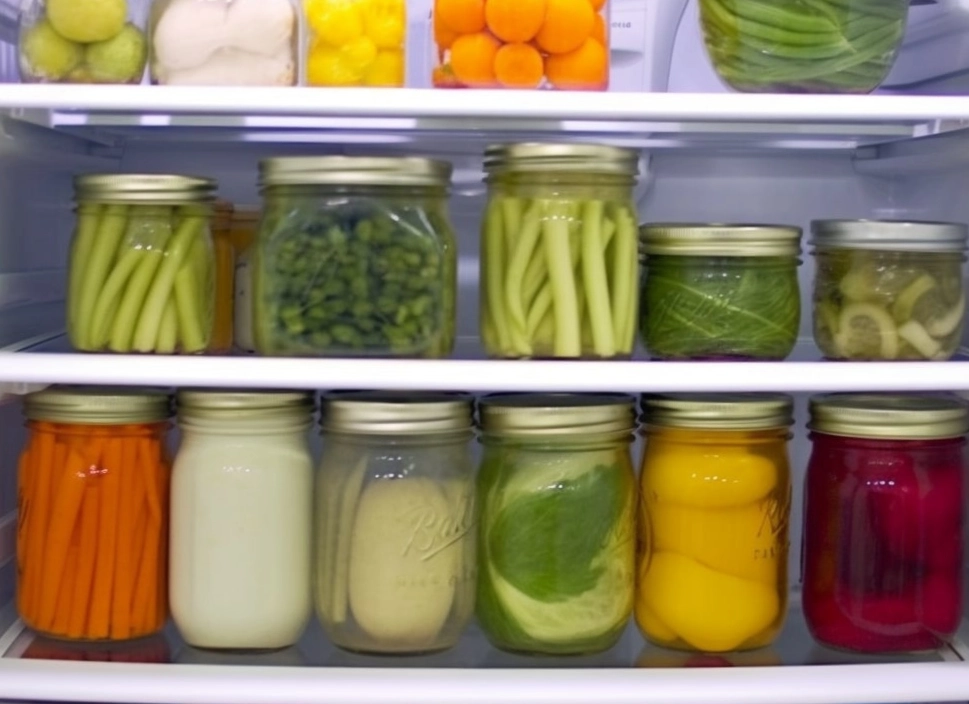
Yes, you absolutely can freeze food in glass preserving jars, but again, this requires careful preparation to prevent breakage due to the expansion of liquids upon freezing.
Here’s the science: When water freezes, it expands by about 9%. If a jar is filled to the brim with liquid and then frozen, this expansion will exert immense pressure on the glass walls, almost certainly leading to cracks or shattering.
Essential Freezing Considerations & Risks:
- Headspace is Key: This is the single most critical factor for successful freezing in jars. You must leave adequate “headspace” – empty space at the top of the jar – to accommodate the expansion of the contents as they freeze.
- General Guideline: For liquids (soups, broths, sauces), aim for at least 1 inch (2.5 cm) of headspace from the top rim.
- For starchy or thick foods (e.g., chili, purees, casseroles, fruit spreads), leave even more, sometimes up to 2 inches (5 cm), as these can expand more dramatically.
- Jar Shape Matters: Not all jars are created equal for freezing.
- Straight-sided jars are highly recommended. These jars have no “shoulders” or constricted necks, allowing the expanding contents to push upwards without putting undue pressure on a narrow point in the glass. Wide-mouth pint or quart jars are ideal for freezing.
- Avoid jars with “shoulders” (narrow necks) if you’re freezing liquids or foods that will expand. These traditional preserving jars, while great for canning, are prone to breaking at the shoulder when contents freeze and expand.
- Avoid Sudden Temperature Changes: Just like with microwaving, thermal shock is a risk.
- Cool Contents First: Never fill a hot jar with hot food and immediately transfer it to a cold freezer. Always allow food to cool completely to room temperature (or refrigerate it first) before placing it in the freezer.
- Thaw Gradually: When you’re ready to use frozen contents, transfer the jar from the freezer to the refrigerator to thaw slowly overnight. Avoid placing a frozen jar directly into hot water or a microwave for rapid thawing, as this can cause it to shatter.
Best Practices for Freezing in Glass Preserving Jars:
- Choose wide-mouth, straight-sided jars.
- Leave adequate headspace based on the contents (1 inch for liquids, more for solids/starches).
- Ensure contents are completely cooled before freezing.
- Label and date your jars for easy identification.
- Store upright in the freezer until contents are completely frozen solid. Once frozen, they can be stored on their sides if needed.
- Thaw gradually in the refrigerator or under cold running water.
Are Mason Jars Oven Safe?
This is where the answer becomes a resounding GENERALLY NO, NOT FOR BAKING OR HIGH HEAT. This is one of the most common and dangerous misconceptions about glass preserving jars.
While these jars are made of glass, and glass bakeware exists, there’s a crucial difference: preserving jars are not designed or tempered for the dry, uneven heat of an oven. They are specifically manufactured to withstand the moist, even heat distribution of a boiling water bath or the pressurized steam of a pressure canner.
Why Ovens Pose a Significant Risk:
- Uneven Heating and Thermal Stress: An oven’s dry, radiant heat can cause different parts of the jar to heat up at different rates. The outside might get hot quickly, while the inside remains cooler, creating immense stress within the glass structure. This uneven expansion is the primary reason for shattering. This differs greatly from canning, where jars are submerged in water, allowing for gentle, even heat transfer.
- Thermal Shock (Again!): Putting a cold jar (e.g., from the pantry or refrigerator) into a preheated oven is a recipe for disaster. The sudden, intense heat will almost certainly cause the glass to shatter explosively.
- Designed for Canning, Not Baking: The glass used for preserving jars is formulated for the specific stresses of home canning, not for direct exposure to baking temperatures. Oven-safe bakeware is made from different types of tempered glass designed to withstand higher, more variable temperatures.
Risks of Oven Use:
- Catastrophic shattering: This is not just a crack; jars can explode into many sharp pieces, scattering glass shards throughout your oven and kitchen.
- Ruined food: Your dish will be contaminated with glass.
- Potential for serious injury: From flying glass or cuts during cleanup.
Very Limited “Safe” Oven Use:
There are virtually no safe scenarios for using glass preserving jars for cooking or baking in a conventional oven. The only extremely limited exception might be:
- Keeping Warm (Very Low Temperature): If you’ve prepared food in a jar and it’s already hot, you might be able to place it in a very low oven (e.g., 150-200°F / 65-93°C, essentially a warming drawer setting) for a short period to keep it warm before serving. This is not for cooking, and the jar must already be warm to minimize thermal shock.
- Sterilization (Not Recommended): While historical canning guides sometimes mentioned oven sterilization, modern food safety guidelines and jar manufacturers strongly advise against it due to the high risk of breakage and ineffective sterilization compared to boiling water methods.
Recommendation: Play it safe. Avoid using glass preserving jars in the oven for baking or high-temperature cooking. Stick to bakeware specifically designed and labeled as oven-safe.
Are Mason Jars Dishwasher Safe?
Finally, a straightforward answer: Yes, glass preserving jars are generally dishwasher safe.
These jars are designed to withstand the high temperatures of boiling water baths and pressure canners, so the heat and agitation of a dishwasher cycle are typically not an issue for the glass itself.
Best Practices for Dishwashing:
- Place Securely: Load jars securely in the dishwasher racks to prevent them from tipping over during the wash cycle. Jars that fall can hit other items and chip or break.
- Temperature: While they can handle high heat, avoid exposing them to sudden, extreme temperature changes just before or after the wash cycle (e.g., running very cold water over a hot jar coming out of the dishwasher).
- Lids and Bands:
- The metal screw bands (rings) are prone to rusting, especially if they stay wet. It’s often better to hand wash these and dry them immediately, or put them on the top rack of the dishwasher and remove them promptly to hand-dry.
- The flat metal lids (sealing discs) are designed for single-use canning and should be discarded after one canning process. If you’re reusing them for dry storage, they can be hand-washed but often retain food odors or stains over time. Many people simply replace these frequently for storage.
- Air Drying vs. Heat Drying: Both are fine. If your dishwasher has a heated dry cycle, the jars will come out warm and dry. If you opt for air drying, ensure the jars are completely dry inside before storing them to prevent moisture buildup, mildew, or unpleasant odors.
Conclusion
Glass preserving jars are truly remarkable for their versatility and durability, but like any tool, understanding their limitations is key to using them safely and effectively.
To summarize the essential safety points:
- Microwave: Generally safe without metal lids, avoid thermal shock, and inspect for damage.
- Freezer: Safe with ample headspace and by using straight-sided jars, cool contents completely before freezing, and thaw gradually.
- Oven: Generally NOT safe for baking or high-temperature cooking due to the risk of shattering from uneven dry heat.
- Dishwasher: Generally safe for the glass jars themselves; hand wash metal bands to prevent rust.
By respecting the properties of glass and adhering to these simple guidelines, you can confidently continue to enjoy the countless benefits that these iconic preserving jars bring to your kitchen and home. Happy jarring, preserving, and organizing!